Melissa's E-Portfolio
"...and this is how I design..."
Computer Applications - CSC60503
Project 1: Modelling of an Architectural Design
Semester 3 saw the introduction to Software in aiding design as we were introduced to AutoCad, 3dsMax and Rhinoceros. Our projects for Computer Applications involves producing a 3D model of a selected architectural design of our choice or our own designs from the final project of Studio 2. We were required to create complete 3D model of the selected design using one or a combination of the given software. Whilst carrying out this project, we were also asked to document and produce our progress in the form of screenshots of our work with the mentioned software.
I decided to go ahead with modelling my design project from Studio 2.
AutoCad was used to draw out the plans of the retreat house
The AutoAad file was then imported into Rhinoceros for the modelling process
The completed model was then brought into 3ds Max for rendering
Rendered images of 5 different perspectives of the Retreat House

The file from Rhinoceros was imported into 3ds Max.

The Renderer was assigned under Render Setup.

Renderer was assigned.

Colours were applied to the different elements in the model using the Material Editor. Transparent material was applied for the glass on the windows. The model was then rendered.


Project 2: Still Rendering with Materials, Lights Camera Views with Site Context
Project 2a: Exterior Renderings
Continuing with our model from project 1, we were required to add in materials and texture, lighting, camera views and site context. Once all these tasks were completed, photorealistic still renderings of the model with its materials and relevant site context were also required to be produced.
3ds Max was used toobtain camera views, daylighting features and still renderings of the exterior views of the Retreat House.
Adobe Photoshop was made use of for enhancement of textures of the materials needed for the model.

Creating Layers in AutoCad before beginning to draw out the plans.

Using Polyline to draw out the plans.

Walls and windows drawn using Polyline.

Using Circles and the Trim tool to draw out a curve in the plan.

Trimmed circle

Using the Offset tool to reproduce the bigger arcs.

Drawing out the stairs.

Staircase completed.The Trim tool is used to get rid of the excess lines/curves etc.

Import the AutoCad file of the Retreat house plan into Rhinoceros.

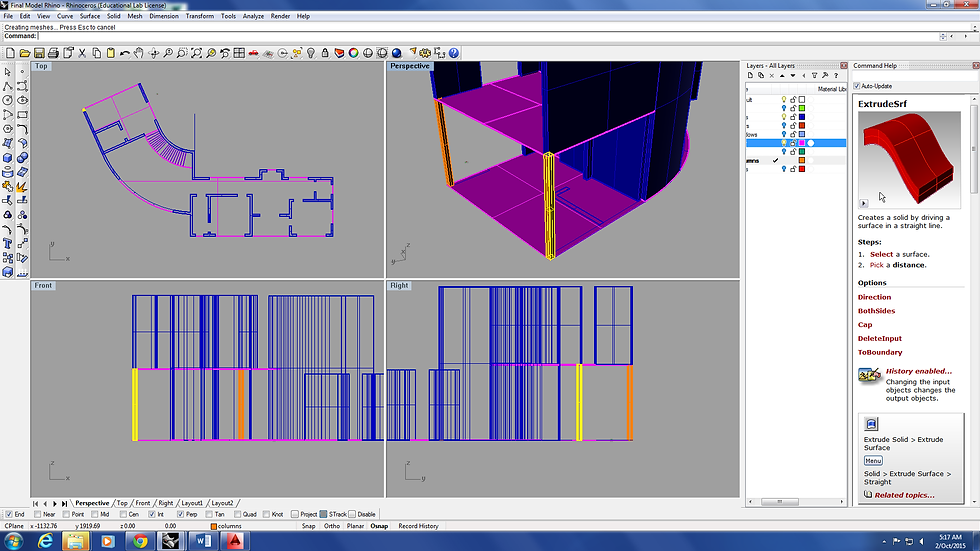
Making use of the different layers, the floor was first made a surface and then extruded to the desired height.

Having made the surfaces for the walls, they were then extruded to the desired heights using the Solid Extrude Surface tool.

Walls being extruded.

The same method was used to draw the stairs. The surfaces for the steps were created and extruded, Then each step was moved vertically up into position.

Extruded floor level, walls and stairs.

Columns were added in using the same method that was used the build up the walls.

Holes are made in the walls for windows using the Boolean Split tool. A horizontal surface is created and positioned to cut the wall.

A jpg file of the desired material texture is opened up in Photoshop.

The saturation level is changed in order to obtain a black and white colour. This file will be used as a bump map to give the material its natural texture.

The bump image is loaded into 3ds max and applied along with its colour in Material Editor under the option Arch and Design.

The desired material is then brought into the material editor.

The material is then added onto the chosen object. Here the wooden material is added to the floor.

Once the material has been assigned to the object, the option UVW Map under Modify is used to orientate and place the texture so it fits in with the object accurately.

Material orientated into place.

Stainless steel material applied in the same manner to the door frames, window frames and railing of the staircase.
Final Rendered Images


Project 2b: Interior Renderings
The same procedure was carried out as in Project 2a in order to create two internal views of the retreat house. The two interior spaces I chose were the living room and library.

Furniture required for the spaces was downloaded.

These files were then imported into 3ds max and scaled appropriately.

Furniture being placed into the living room of the retreat house.

More furniture being added into place.

A target camera was then created and placed inside the house.

An appropriate angle of view was chosen.

First test rendering of the living room.

Second complete test rendering of the living room.
Final Interior Renderings


Project 3: Animation of the completed 3D Scene
In this project, we were required to create an animation of of our 3d model lasting a maximum of 90 seconds. 3ds Max was used to create an animation and walkthrough of some of the spaces in the retreat house. I decided to do an animation of the exterior, living room, library and office. Windows Movie Maker was used to combine the rendered video clips together and the narrative behind the design was created by adding text and background music to the final video.
Animation for the introduction


Animation of the exterior view and walk through of the interior


